Wednesday, June 23, 2010

Guidelines to create Quality content on your Blog

Blog posting guidelines
If you follow my guideline in writing posts, then I am sure that you will definitely notice a good progress. My guidelines involve the improvement of site performance, page rank on search engines, image optimization and content of post.

Post Title or Article Title: Title should be descriptive, accurate and unique and it should point the topic or central idea of particular post. It is better to express title in 5 to 10 words. Don't create titles for search engines i.e. filling title block with keyword not related to content.

Post content or Body of the post: It elaborates the theme of article in detail, so write introduction to concept of your post at the beginning and describe in your own words. You should educate visitors on your concepts by defining the concepts or keys of the article and give examples. It experience good for readers. If you add an image, then it looks perfect and gives good impression. Provide relevant description. Avoid copying content from other internet source. It does not add values to your post. Search engines detect your content as duplicate and never result your site well so make a habit of writing post in your own words. Make sure that your pages have no grammatical mistakes.

It is important to note that topic should be fresh, useful, live and information-rich and then only your site gets popular, earns backlinks and brings more traffic. Post articles on your site at least twice or thrice a week. Avoid placing unnecessary codes and scripts on your page.

Image search optimization:
  • File name should be informative and related to image. Suggested file names are like blogger_logo.jpg, but not IMG0058.JPG.
  • Make use of alt attribute to provide a small description of image.
  • Provide Good quality photos and compress their size.
  • Specify a width and height for all images in their code.

Wednesday, April 14, 2010

Add a smarter Favicon to Blogger Blog - Shortcut Icon

Favicon means favorites icon, is a 16×16, 32×32 or 64×64 pixel square icon associated with a particular website. It is also known as a shortcut icon, URL icon, website icon, or bookmark icon. Browsers that provide favicon support typically display a page's favicon in the browser's address bar and next to the page's name in a list of bookmarks. It is the great advantage for Web designers to represent their web page in graphical way. Favicon gives unique look for your website and attracts visitors.

How to add a favicon to a web page
  1. Choose your favicon file in .ICO format. By using some icon maker software like Easy Icon Maker, you can design your own icon or search on Google
  2. Upload your file to external hosting to get direct link. Here is one website that provides free hosting Iconj.com. A piece of code will be given there.
  3. Favicon guide
  4. Now edit HTML and insert code after <head> tag. If you have your own hosting, then change below code line according to your favicon location. 
<link rel="shortcut icon" href="http://example-location.com/somepath/image.ico" type="image/x-icon" />
For any information, you can leave a comment at the end of post.

Friday, April 2, 2010

Free website visitor tracker, web stats - StatCounter

Do you ever tried to know how many people are visiting your blog, or where they come from? You can track the visitor stats using web tracker sites like Google Analytics, Site Meter, StatCounter. Web stats are useful in optimization of your blog.

There are many sites which provide stats on blogs or websites. But I use and recommend statcounter because it is simple, more informative, free service, real-time stats and easy to install. StatCounter is offering both invisible and visible trackers.

Steps to be followed to install visitor tracker:
Statcounter working process
Working of StatCounter
  1. Register an account in StatCounter.
  2. Create a Project. There you will be given one tiny HTML and Javascript code.
  3. Insert the code on your blog or website. For blogger, Go to Design, add a HTML / JavaScript gadget, and copy the StatCounter code into the gadget.  Position the gadget where you wish, like you did the other gadgets.
  4. Now you can analyze your stats.
StatCounter Visitor reports includes:
  • Date and time of visit.
  • Ip address.
  • Browser details.
  • Operating system info.
  • Screen resolution.
  • Referring link.
  • Search query details.

Friday, March 12, 2010

Meta tag helps your blog in Search Engine Promotion

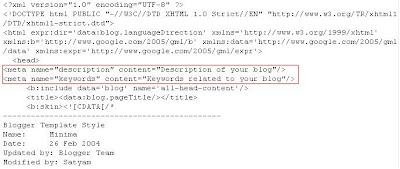
Meta tags are important for Search Engine Optimization because Google and other search engines might use them as snippets for your pages. A page description Meta tag gives summary of what the page is about.  It might be a sentence or two or a short paragraph. It might help search engines to find content and to matching up with a user's search query. 

Structure of Meta tags for description and keywords:
<meta name="description" content="Description of your blog"/>
<meta name="keywords" content="Keywords related to your blog"/>
Keywords should be separated by commas

Add a Meta tag in to your HTML:
1. Modify the colored text, according to your blog.
2. Open Blogger Dashboard in blogger --->> Next click your blog Design option --->> click Edit HTML.
3. Find <head/> tag and Paste Meta Tag just below it. Click Save Template.
Meta tag guide
You should remember following things:
  1.  Don't fill description with only keywords.Search engines will ban your site from their listing. So use distinct,related and informative description.
  2. Avoid writing a description Meta tag that has no relation to the content of your blog.
  3. Using generic descriptions like "Page about"or "This is a web page" are not recommended.
  4. Don't Copy and paste the entire content of the posts into the description Meta tag.
  5. Repeating keywords again and again may give negative result.  

Monday, March 8, 2010

Get your Research paper in essay-point.com

We have best reseach papers writing services in essay-point.com. They have different plans based on your urgency. Go and check it!

Friday, February 26, 2010

Optimize your blog images and code for search engines

This time, I 'm explaining about Image Search Optimization (ISO). It is the way to drive organic traffic from image search engines. If you observe HTML code of images, you will find "alt" attribute; other wise you can insert it to the code.  The "alt" attribute allows you to specify alternative text for the image.  If the image cannot be displayed for some reason, then the text of the "alt" attribute provides information about image.
HTML code of images
Alt content helps your pictures to index in image search results. Proper alt text and file-name makes it easier for image search projects like Google Image Search to better understand and search bots can easily crawl your images. Effect of alt text was showed in below image.
Image was not displayed to the user for some reason, but text was there.

Optimizing tips to be followed:
  • File names and alt text should be brief, short and descriptive. Don't give generic file names like "img.jpg", "pic1.gif", "1.jpg.  Avoid writing extremely lengthy file names and pasting entire sentences.
  • Use commonly supported file types like JPEG, GIF, PNG, and BMP formats.
  • Reduce your images size because images of low size can load fast. Use Image optimization tool to compress your image size without affecting image quality or use any photo-shop software.    

Wednesday, February 24, 2010

How do I move a blog between two Google accounts?

Process of moving a blog between gmail/Google accounts:

1. Sign in to Blogger with Google account-1, containing the blog which you'd like to move.
2. Now Open Dashboard, go to the Settings --->> Permissions tab.
Blogger Guide
3. Click the Add Authors button and send an invitation to the Google account-2.
4. Now log in to Gmail of Google account-2; click on the confirmation link that you have received and accept invitation (use a different browser).
5. Go back to the Dashboard of Google account-1 and open Settings --->> Permissions tab.
6. Click the grant admin privileges link to give Administrator privilege to the Google account-2.
7. Again go to the Blogger Dashboard ---> Settings --->> Permissions of Google account-2 and remove the Google account-1 from Blogger.
8. Your blog is moved to your destination account.